If you've been following my previous posts on building LTI 1.3 tools for Canvas LMS, you already know how to set up basic LTI launches and configure developer keys. If you haven't read those yet, I'd highly recommend checking them out first:
These posts cover the foundational concepts of LTI flow and basic setup. Since I don't want to repeat those explanations here, this post assumes you're familiar with that groundwork and focuses specifically on Deep Linking.
What is Deep Linking and Why Do You Need It?
Deep Linking is an LTI feature that allows your tool to let instructors select and insert content directly into Canvas. Instead of just launching your tool in a new window, Deep Linking enables a content selection workflow where:
- The instructor clicks a button in Canvas (like in the Rich Content Editor)
- Your tool opens in a modal/iframe showing a content picker
- The instructor selects content (links, images, HTML, etc.)
- That content gets inserted directly into the Canvas page/assignment/discussion
Think of it like the "Insert Image" or "Insert Link" buttons in any text editor, except the content comes from your external tool. This is crucial for tools that provide educational resources, media libraries, assessment content, or any interactive materials that instructors want to embed in their courses.
Without Deep Linking, instructors would have to manually copy-paste URLs or embed codes. With Deep Linking, it's a seamless, integrated experience.
Setting Up Deep Linking in Canvas
Step 1: Configure Developer Key and Placement
First, you need to set up your LTI Developer Key with the basic configurations (Login URI, JWKS URL, Redirect URIs) as explained in my previous post. If you've already followed that guide, you'll have these basics covered.
Now, to enable Deep Linking, you need to configure the placement in your Canvas Developer Key. In the Canvas Admin panel under Developer Keys, edit your LTI key and configure the placement:
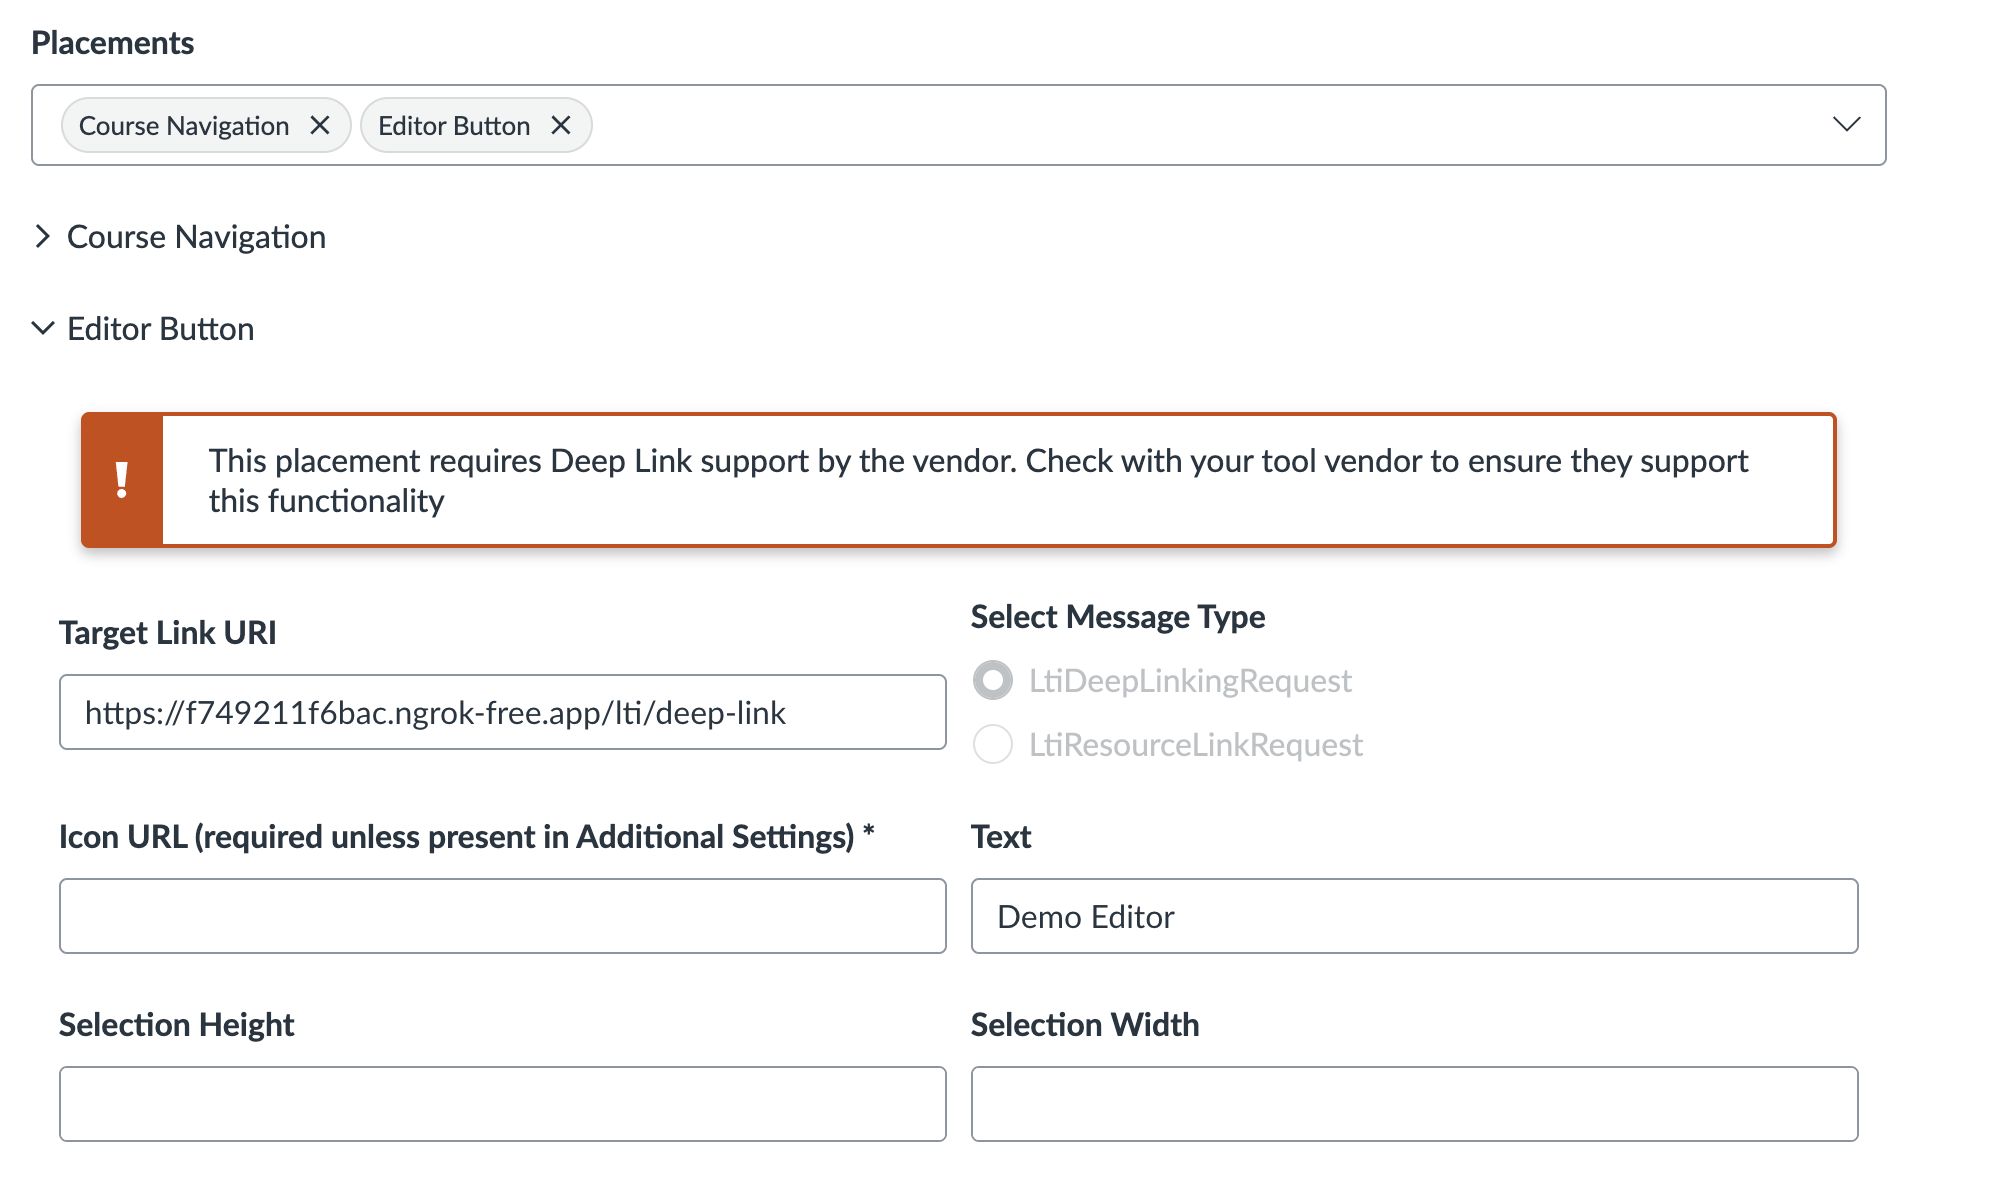
The key settings here are:
- Placement: Editor Button (for Rich Content Editor integration)
- Target Link URI: Your deep linking endpoint (e.g.,
https://your-tool.com/lti/deep-link) - Select Message Type: LtiDeepLinkingRequest
Canvas supports multiple placements like Course Navigation, Editor Button, Assignment Selection, etc. For content insertion, Editor Button is the most common choice.
Step 2: Install the App
Once your developer key is configured, install the app at the account level so it's available across courses. If you need detailed instructions on installing LTI apps, check out my LTI setup guide.

Important: Make sure to turn on the "Add to RCE toolbar" option when installing the app. This makes your tool appear as a button in the Rich Content Editor toolbar.
Step 3: Understanding the Deep Linking Flow
Once installed, your tool will appear as a button in the Rich Content Editor. You'll see this editor button placement in multiple places across Canvas:
- In the Pages section when creating or editing pages
- In the Assignments tab when creating assignments
- In discussions, announcements, and anywhere the Rich Content Editor appears
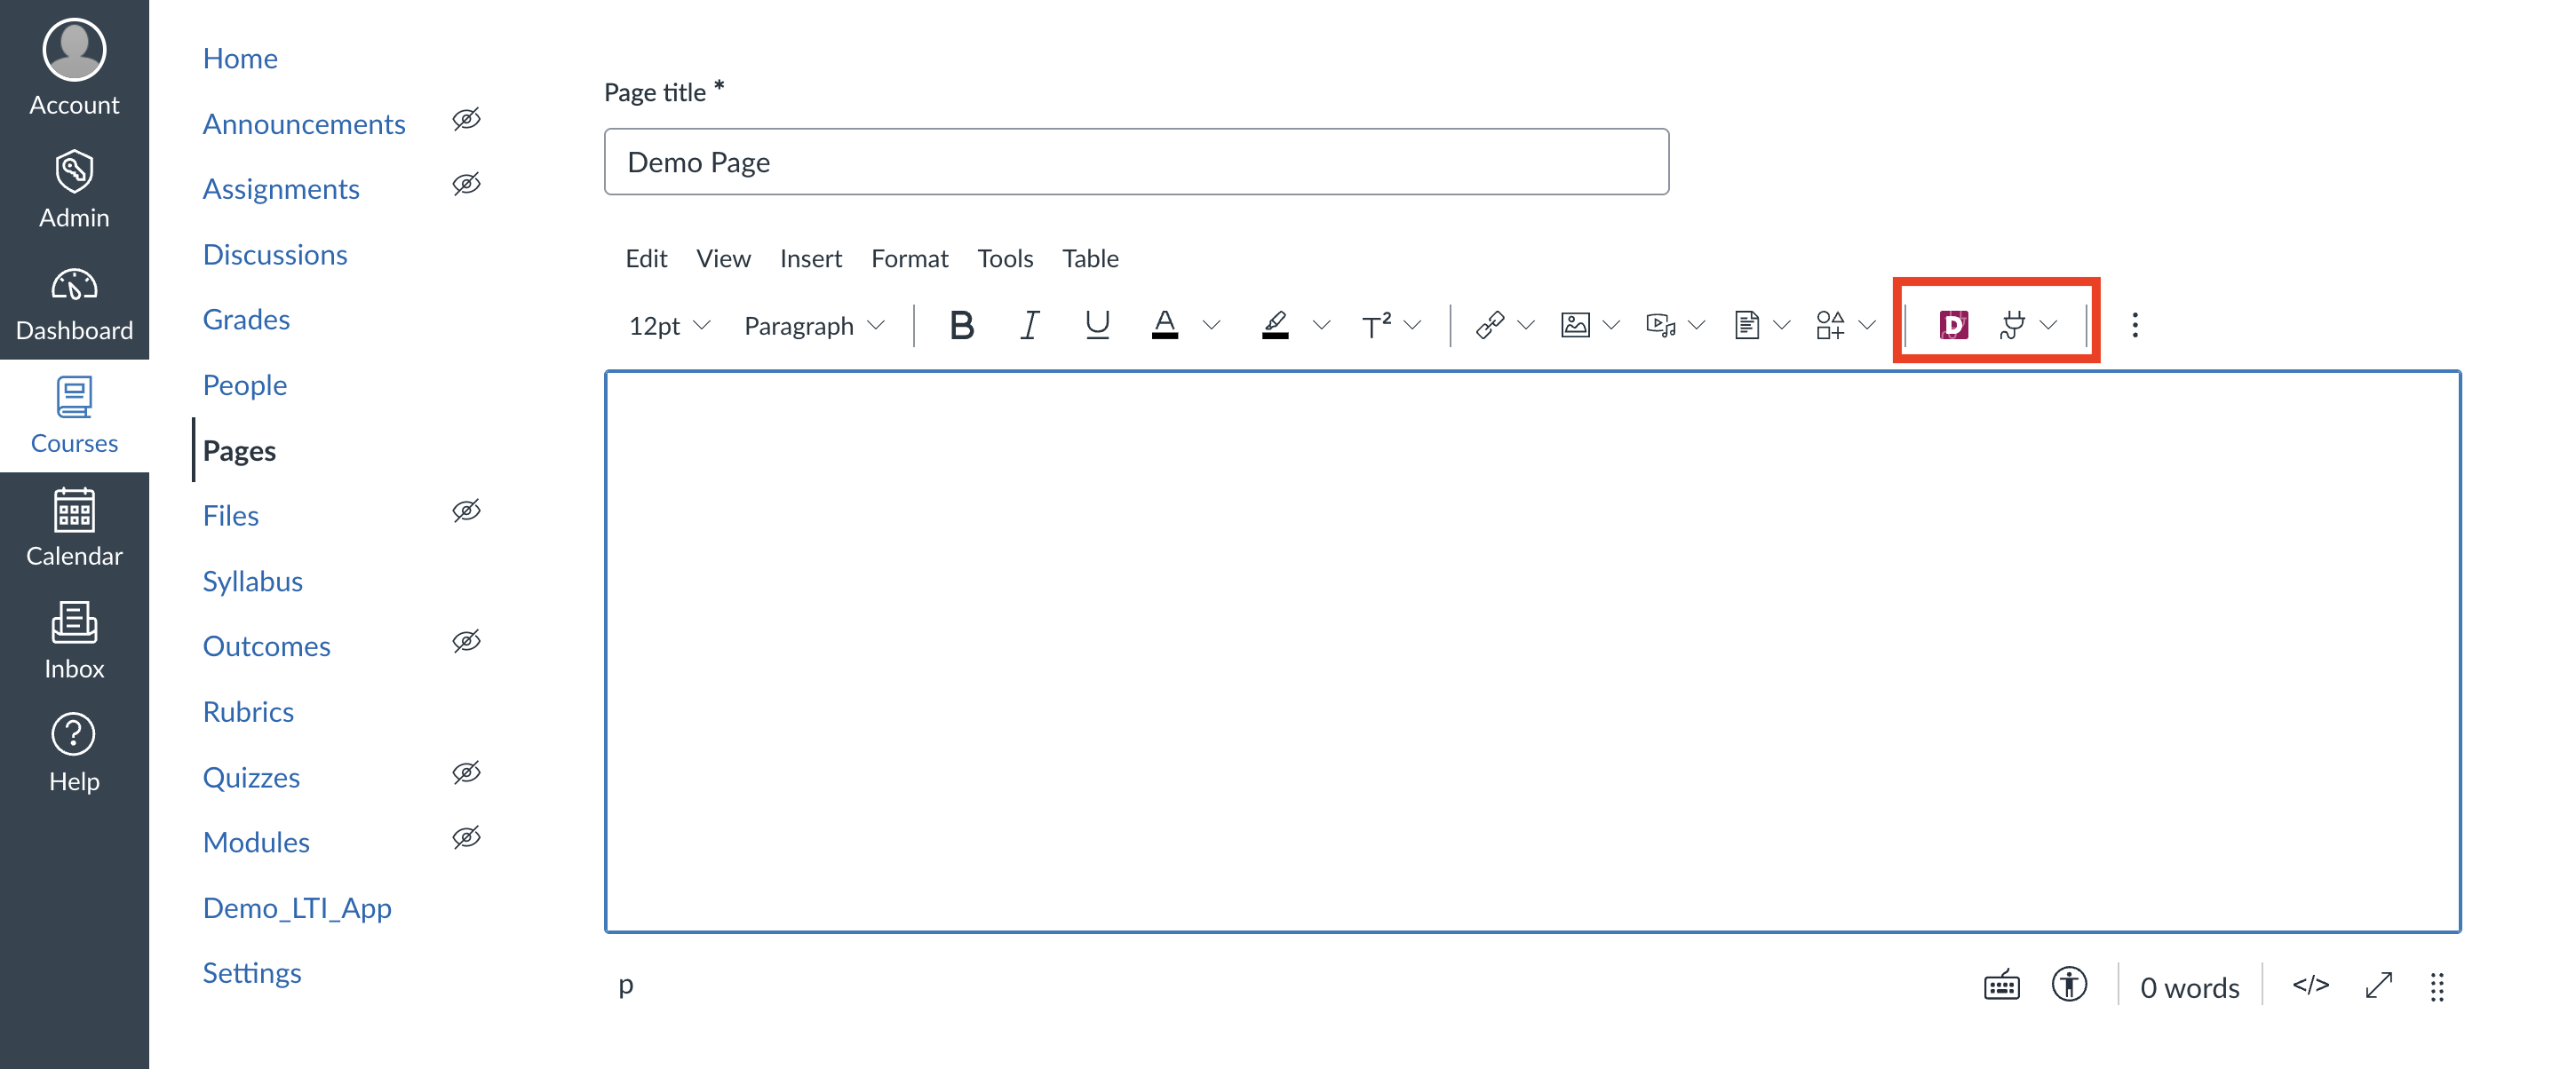
When an instructor clicks your tool button (like "Demo Editor" in the toolbar above), Canvas initiates the LTI Deep Linking flow. Here's what happens in simple terms:
- Canvas sends a request to your
/lti/loginendpoint (OIDC login initiation) - Your tool redirects to Canvas's authorization endpoint
- Canvas validates and redirects to your
/lti/launchendpoint with the LTI message - Your launch endpoint validates the JWT and redirects to the Target Link URI (your deep linking endpoint)
This is the standard LTI launch flow covered in detail in my Build LTI 1.3 Tool post. The key difference with Deep Linking is that the message type will be LtiDeepLinkingRequest instead of LtiResourceLinkRequest.
Implementing the Deep Linking Handler
You can check out the complete sample code implementation here. The following snippets highlight the key parts.
Handling the Deep Linking Request
After the standard LTI flow (login → launch), your /lti/deep-link endpoint receives the request. At this point, the LTI launch has already been validated in your /lti/launch endpoint, and you're working with the validated payload:
// Sample snippet — see the full implementation in the link above

app.get("/lti/deep-link", async (req, res) => {
  const payload = req.session.ltiData.fullPayload;

  const messageType =
    payload["https://purl.imsglobal.org/spec/lti/claim/message_type"];
  if (messageType !== "LtiDeepLinkingRequest") {
    return res.status(400).send("Not a Deep Linking request");
  }

  const deepLinkSettings =
    payload[
      "https://purl.imsglobal.org/spec/lti-dl/claim/deep_linking_settings"
    ];

  // Store critical info for later use
  req.session.deepLinkData = {
    deep_link_return_url: deepLinkSettings.deep_link_return_url,
    accept_types: deepLinkSettings.accept_types,
    accept_multiple: deepLinkSettings.accept_multiple,
    data: deepLinkSettings.data,
    fullPayload: payload,
  };

  res.redirect("/lti/content-selector");
});
The deep_linking_settings claim contains crucial information:
deep_link_return_url: Where to send the selected content back to Canvasaccept_types: What content types Canvas accepts (link, image, html, ltiResourceLink, file)accept_multiple: Whether multiple items can be selectedaccept_presentation_document_targets: How content should be displayed (embed, iframe, window)
Building the Content Selection UI
Next, show your content picker interface. The UI adapts based on what Canvas accepts:

This interface shows available content types (External Link, HTML Content, Image) that the instructor can choose from. Notice the message at the top indicating "Multiple selection enabled" - this comes from the accept_multiple setting.
When the instructor fills out the form for their content:
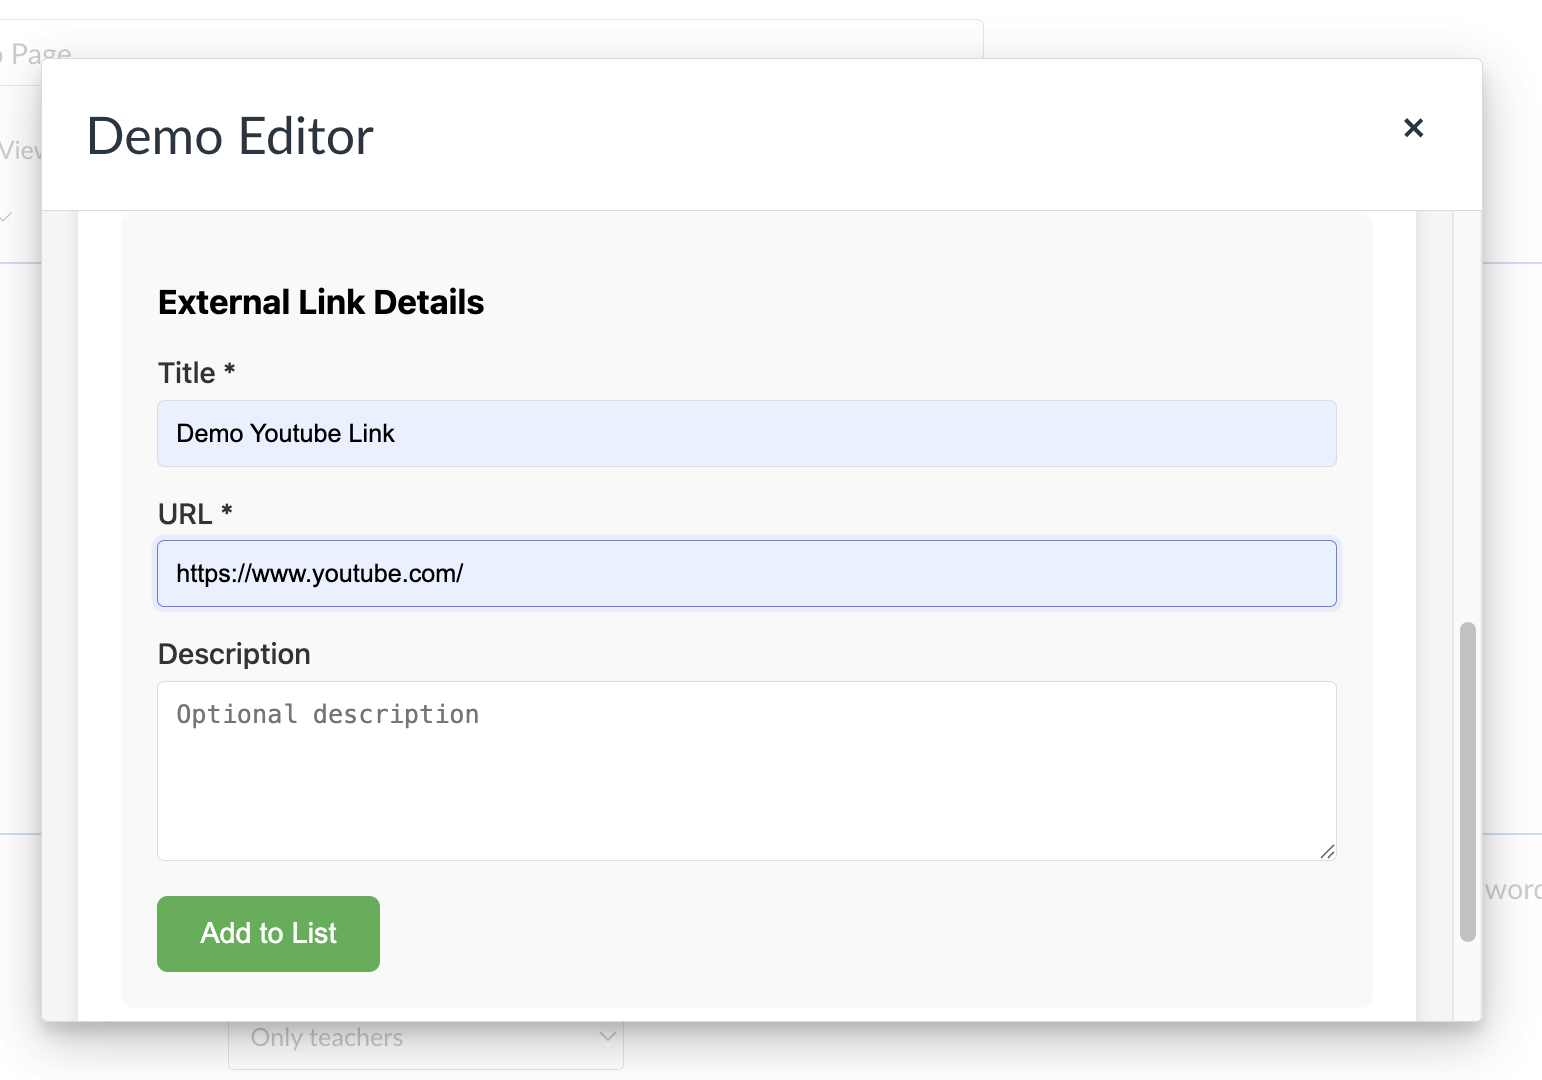
The form collects necessary details like title, URL, description, and for images, dimensions as well.
Creating the Deep Linking Response
Once content is selected, you need to create a JWT response containing the content items:
// Sample snippet — see the full implementation in the link above

async function createDeepLinkingResponse(
  contentItems,
  originalPayload,
  deploymentData
) {
  const payload = {
    iss: process.env.CLIENT_ID,
    aud: originalPayload.iss,
    exp: Math.floor(Date.now() / 1000) + 600,
    iat: Math.floor(Date.now() / 1000),
    nonce: uuidv4(),
    "https://purl.imsglobal.org/spec/lti/claim/message_type":
      "LtiDeepLinkingResponse",
    "https://purl.imsglobal.org/spec/lti/claim/version": "1.3.0",
    "https://purl.imsglobal.org/spec/lti/claim/deployment_id":
      originalPayload[
        "https://purl.imsglobal.org/spec/lti/claim/deployment_id"
      ],
    "https://purl.imsglobal.org/spec/lti-dl/claim/content_items": contentItems,
    "https://purl.imsglobal.org/spec/lti-dl/claim/data": deploymentData,
  };

  const key = await importPKCS8(privateKey, "RS256");
  const jwt = await new SignJWT(payload)
    .setProtectedHeader({ alg: "RS256", kid: publicJwk.kid, typ: "JWT" })
    .sign(key);

  return jwt;
}
The content items array contains objects describing each piece of content. For example, a link item:
// Sample snippet — see the full implementation in the link above

{
  type: "link",
  title: "Demo Youtube Link",
  url: "https://www.youtube.com/",
  text: "Demo Youtube Link"
}
Or an image item with dimensions:
// Sample snippet — see the full implementation in the link above

{
  type: "image",
  title: "Demo Image",
  url: "https://example.com/cat.jpg",
  text: "A cute cat",
  width: 500,
  height: 400
}
For more examples of different content types including file uploads, LTI resource links, and other response formats, check out the IMS Global Deep Linking Response Examples.
Submitting Content Back to Canvas
Finally, create an auto-submitting form that posts the JWT back to Canvas:
// Sample snippet — see the full implementation in the link above

res.send(`
  <!DOCTYPE html>
  <html>
  <body>
    <div class="loading">
      <div class="spinner"></div>
      <h2>Inserting content...</h2>
      <p>Please wait while we return to Canvas</p>
    </div>
    <form id="deep-link-form" action="${deep_link_return_url}" method="POST">
      <input type="hidden" name="JWT" value="${jwt}">
    </form>
    <script>
      setTimeout(() => {
        document.getElementById('deep-link-form').submit();
      }, 100);
    </script>
  </body>
  </html>
`);
The Result
After the form submits, Canvas processes the content items and inserts them into the page:
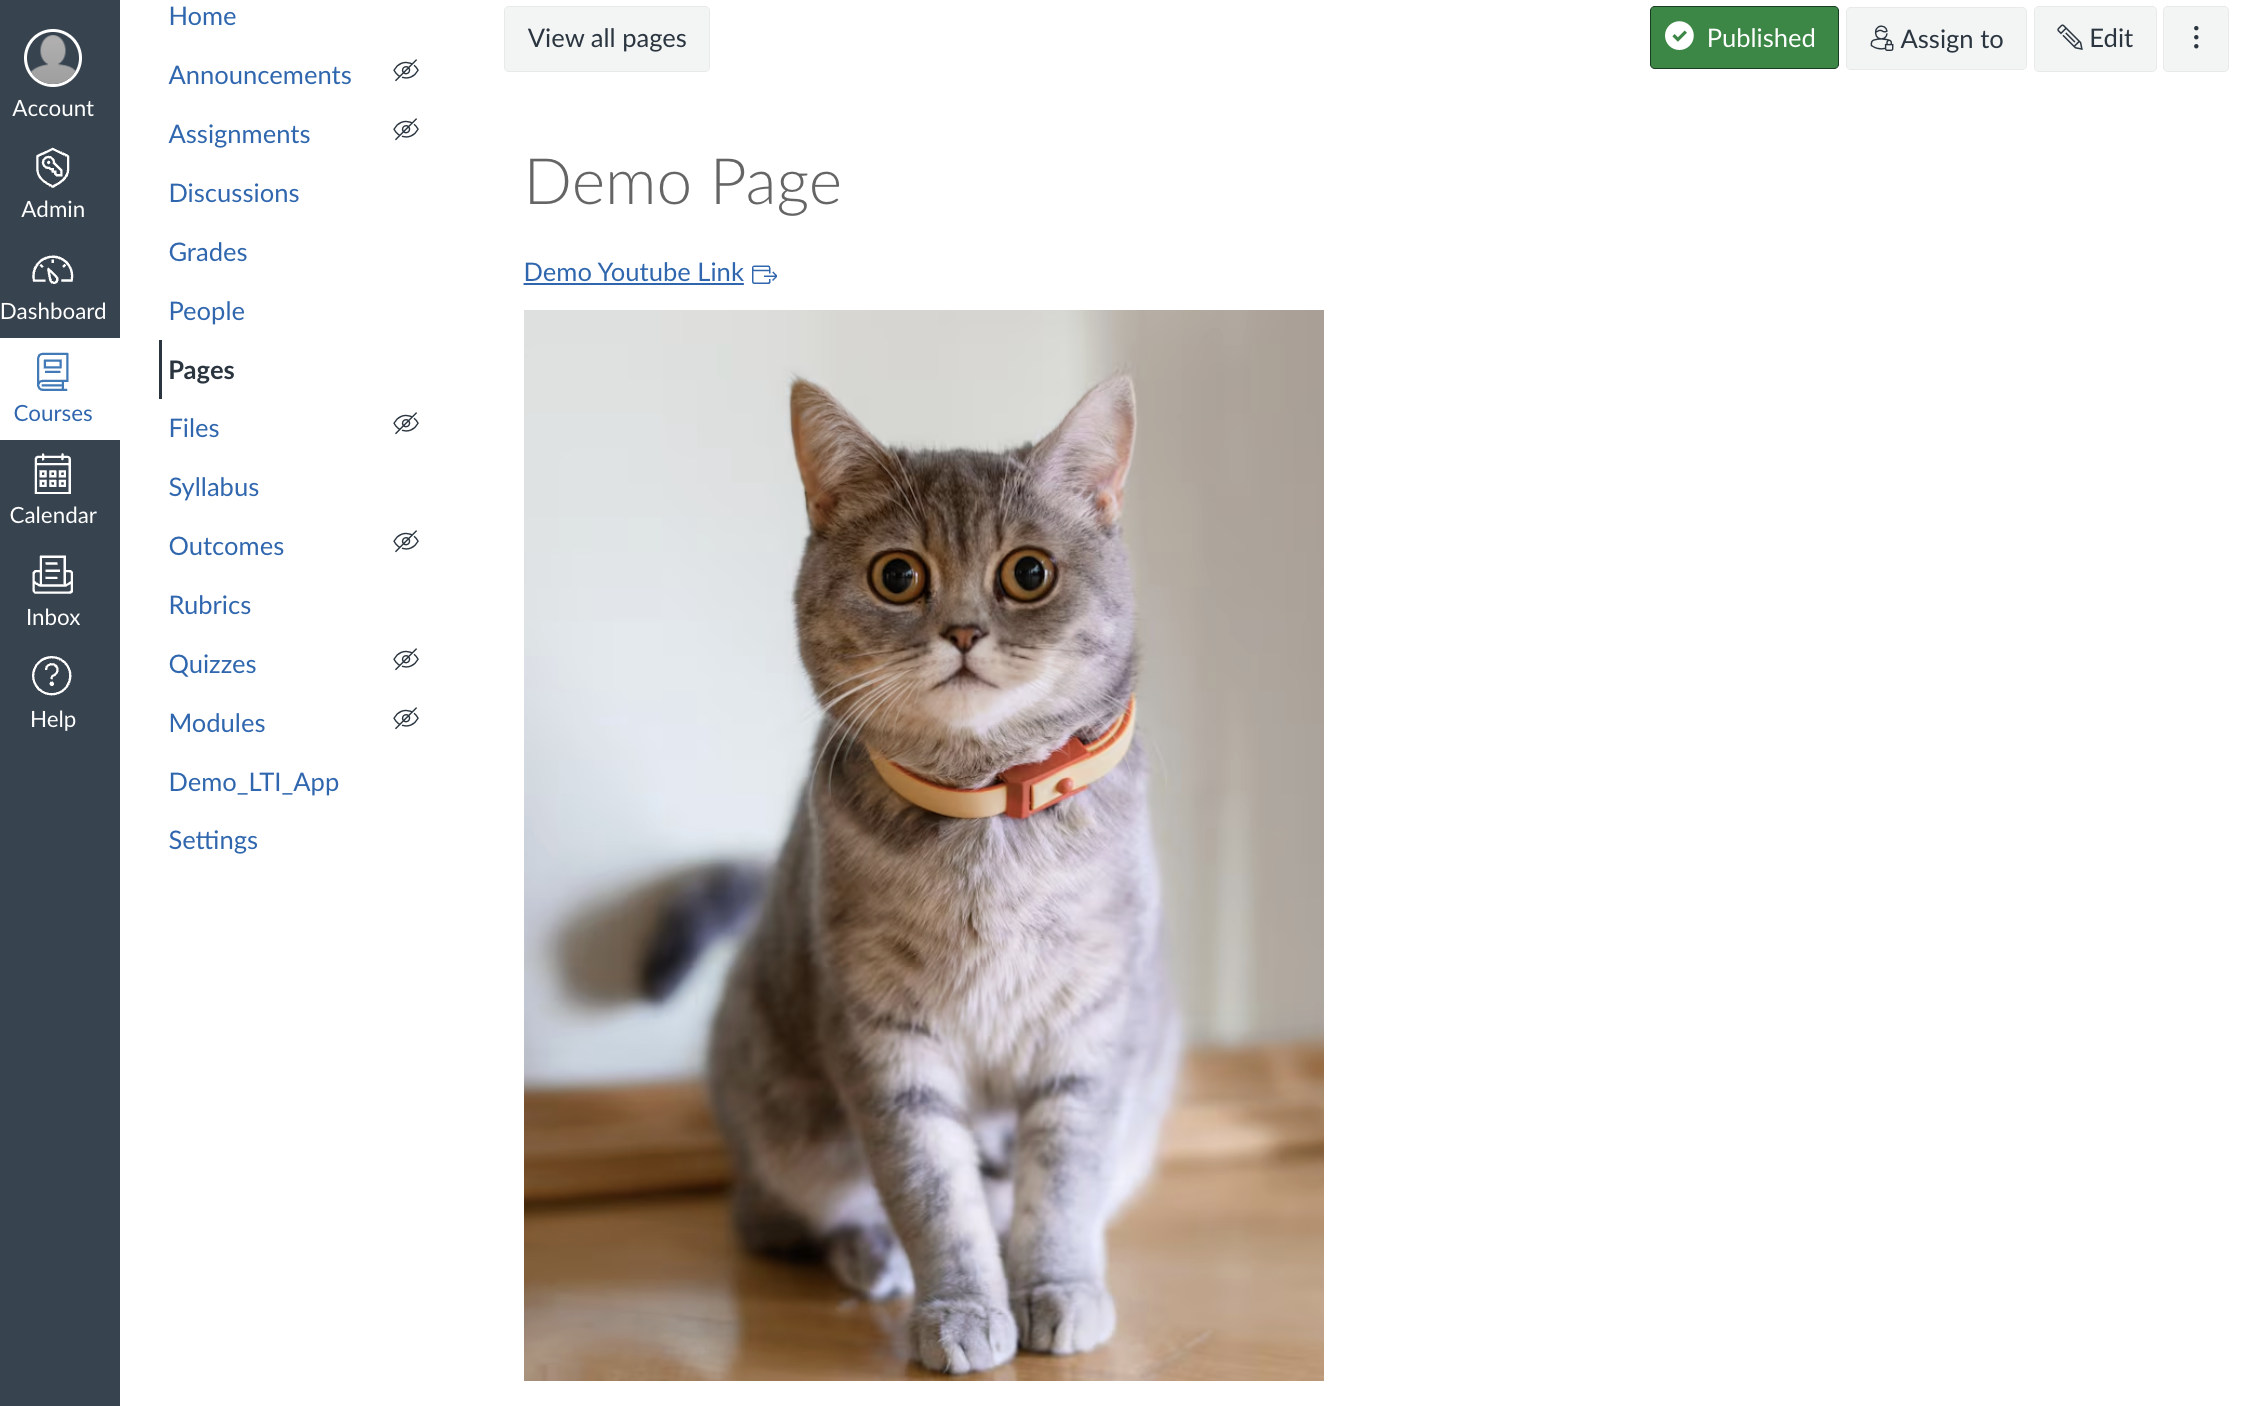
The link and image are now embedded in the Canvas page exactly where the instructor clicked the editor button. The content is live and functional - the link is clickable and the image displays properly.
Supporting Multiple Content Types
Your tool can support various content types based on accept_types:
- link: External hyperlinks
- html: Custom HTML content (embedded iframes, widgets, etc.)
- image: Images with optional dimensions
- ltiResourceLink: Launches back to your tool (for interactive content)
- file: File uploads
The key is checking deepLinkSettings.accept_types and only showing options Canvas supports.
Multiple Item Selection
When accept_multiple is true, you can let instructors build a list of items to insert all at once. The UI should:
- Let them add multiple items to a temporary list
- Show what's been selected with remove buttons
- Have a single "Insert All Content" button that submits everything
This is great for tools that provide libraries of content where instructors might want to insert several resources at once.
Common Issues
1. Content Item Validation: Canvas validates content items strictly. Missing required fields (like type, title, url) will cause the entire response to fail.
2. JWT Signing: Your Deep Linking Response JWT must be signed with your tool's private key (the same one used in your JWKS endpoint), not Canvas's public key.
3. Modal vs. New Window: The accept_presentation_document_targets affects how your tool launches. "iframe" or "embed" means you're in a modal with limited space - design your UI accordingly.
Testing Your Implementation
To test Deep Linking:
- Create a test page in Canvas
- Click Edit and open the Rich Content Editor
- Click your tool's button in the toolbar
- Select content and submit
- Verify the content appears correctly in the editor
- Save the page and check the published view
Monitor your server logs for the JWT payload structure - it helps debug issues with content item formatting.
Conclusion
Deep Linking transforms your LTI tool from a standalone application into an integrated content provider within Canvas. It creates a seamless instructor experience for embedding your content directly where it's needed.
The flow is: Request → Selection UI → Response JWT → Content Insertion. Master this pattern, and you can build powerful content integration tools that feel native to Canvas.
Remember, the complete sample code is available at the link above. The snippets shown here are meant to illustrate the key concepts.
Additional Resources
For more in-depth information about Deep Linking and content item specifications, check out these official documentation: